Lunch for me is a very subdued affair.As I have mentioned umptieth times before here in this blog, I hate cooking for myself. I am not a fan of leafy salads either. They really dont fill me up and I end up feeling doubly hungry, deprived and I end up overeating later on. To avoid that, I opt for healthy and filling soups accompanied by sizable piece of breads. Warm and nutritious, Soups are one of nature's best foods.
I have this recipe from a gal pal of mine who got it from her sister (and so on...goes the chain). I have made Red Lentil soup before but the addition of coconut milk along with lemongrass makes all the difference. Bursting with flavour and protein, this will soon become your go-to meal often enough, mark my words :) Serve it with a crusty bread.
Method
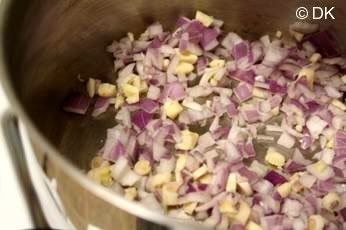
In a saucepan, in 1/2 tsp oil saute onions, garlic and lemon grass until soft.
Add the lentils along with the spices.
Add the coconut milk, 2 cups water (add more to suit your consistancy) bring to a boil and then simmer covered until soft and mushy
Add the juice of lemon, scallions, salt, pepper.
Serve warm garnished with scallions, paprika and cilantro.
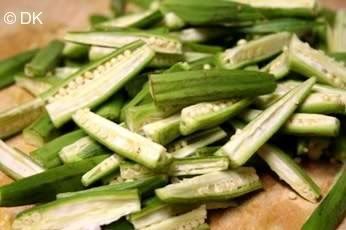
For all those mushy ladies finger haters and also for 'Oh no! Same old lady finger curry!!!" naysayers - this Bhindi Do Pyaza is for you :) Bhindi (Ladies finger) Do (two) Pyaza (Onions) is a North Indian dry curry where it denotes onions used twice the normal amount with Ladiesfinger to make this dish. One just needs more onions and do a stir fry along with ladiesfinger and ta-da, the dish is ready. I am going to dissapoint the 'Hail Frozen Foods' folks here since I am really sorry, Frozen ladiesfinger will not work at all. If you really want to, then its mushy heaven for you :)
I have seen few variations, esp one with tomatoes added to it. Somehow I prefer when the fusion of onions and ladiesfinger is not distracted by the addition of tomatoes.Although this dish will not find its way under "Done within 10min" category, it sure is worth that wee bit of extra patience. The trick to avoid the mushiness is not to cover when cooking these ladiesfingers and also to use fresh ones. Not frozen. Prep time is approx 5-10min and cooking time another 15-20min. But the 30minute wait makes it worth it at the end of it all :)
Method
Wash, clean and dry the fresh ladiesfinger thoroughly. Should not be wet. Chop of the ends and slice them.
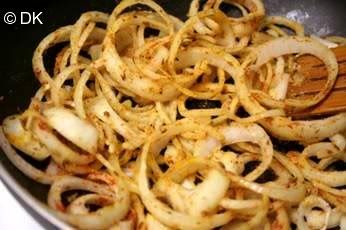
In a pan, in 1/2 tsp oil, add the cumin seeds. When lightly brown, add the onions, ginger garlic paste, salt and the spices (except Garam Masala and Mango powder) and stir until soft
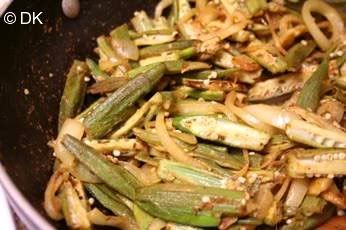
Add the Ladiesfinger, give a quick stir on high flame until it is coated with the onion-spice mixture. Then reduce the flame to low-medium and give it a stir every 5 minutes.
The dish is done when the ladiesfinger turn soft - takes about 15-20min..
It will not be mushy nor will it be crunchy. Just the right bite to it. Just 2 min before taking off the flame, add the remaining two spices, stir and serve warm with Phulkas, Chapathi or White Rice
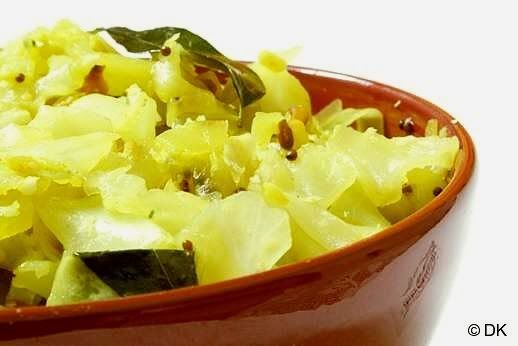
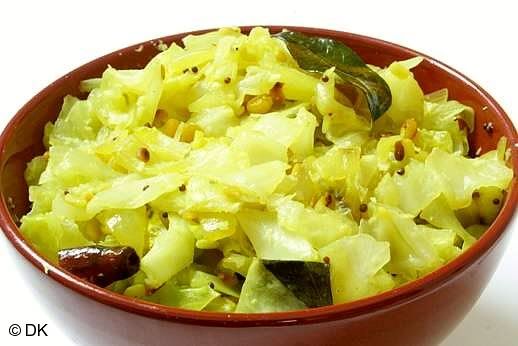
He : Honey..I am so hungry! Whats special for dinner tonight? She: mm..Usual Rasam but I made Cabbage Upkari..(looking at him with happy bright eyes!) He : Oh cool! Sounds new! Lemme take a taste..... (comes into kitchen, scoops a spoonful of the upkari ...chews..chews some more and now there is a small frown in his forehead!) He : Ok Ok..I am tired but not that tired to not even notice that you are trying to cheat me with the same old cabbage that you make by giving it a different name! Its the boring cabbage after all! She (grinning) : yeah - This same old boring cabbage (for you that is!) that I made is actually called Upkari and its not boring! I love it..
....And thus goes the conversation/ Has it ever happened to you that what you thought was "your creation" actually exists with a name to top it off? It has happened quite so often. I have posted the other famous egg-in-a-hole which was supposedly my creation until I saw the same being made on TV!!!! I have been cooking cabbage this way ever since..mm..I started cooking and only last year, thanks to bloggers I got to know that it is actually called Upkari - a Konkani dish meaning "side dish" in that language. It is called so when any vegetables are cooked with coconut and in water. So much for my originality! (smirking!) Anyways here is my version(!Duh!)
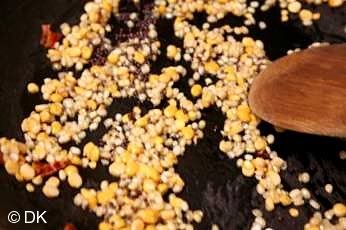
Method
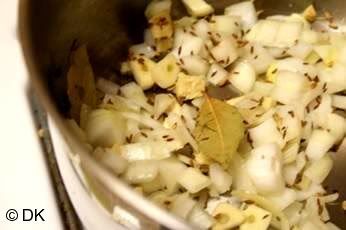
In 1/2 tsp of oil, saute the lentils , chillies until lightly golden, add the mustard seeds
and once they start popping add the onions
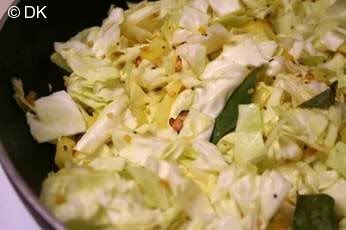
Add the cabbage along with little salt, asafoetida and turmeric.
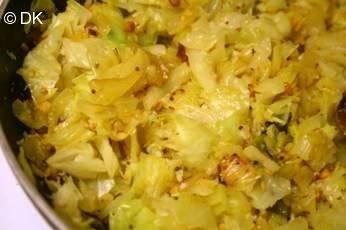
Saute for 2 minutes, sprinkle slightly with water (I dont like my cabbage too mushy!), close the lid and cook until the cabbage is slightly soft.
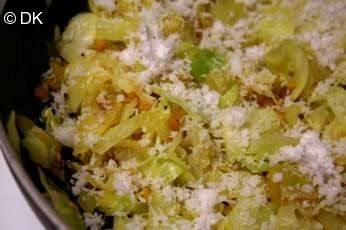
Add the coconut and curry leaves.
Cook for another 2 minutes in open flame and serve warm.
Lentils(dal) is predominantly a major player in my kitchen. We love dals and we usually accompany it for our dinner with roti's / phulkas. The protein in the dal helps to satisfy our hunger faster and thereby eat less. I consume these often enough to cut the amount of rice I eat per day. I cannot do without rice though, hence eating minimal works for me. Also including greens at least twice each week is another habit in my kitchen. The nutrients that it has to give is immense. Try to buy fresh greens and cook them on the same day. That way nutrients are not lost too much.
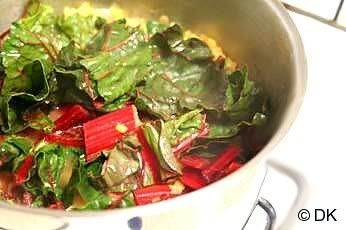
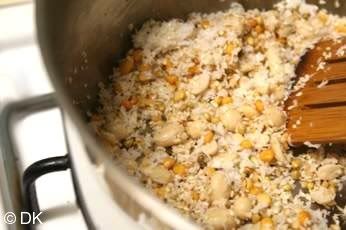
Recently on my recent grocery shopping, I came across the freshest looking Red Chard. I bought them home and thought of making a stir fry. I was not too sure if it will go well with my khasta roti, so thought of making it into a dal instead. The afternoon lunch was a joke with not so much of protein hence I thought I will make a mixed dal constituting 5 different lentils cooked together and add in the red chard alongwith it. It turned out to be a very satisfying meal.
Method
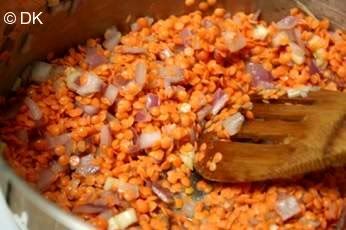
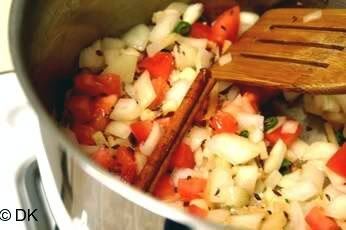
In a saucepan, in 1/2 tsp oil add the spices. Saute for few seconds until aromatic. Add the onions and tomatoes along with salt, stir for 1 min and then add ginger and garlic.
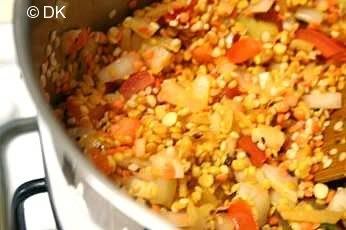
Add the lentils(washed with cold water until clean water runs through),
stir for few more minutes and then add about 3 cups of water (or vegetale stock) along with turmeric.
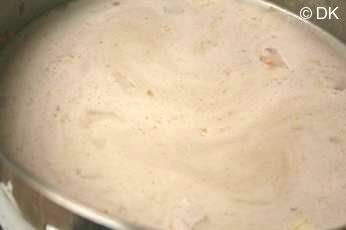
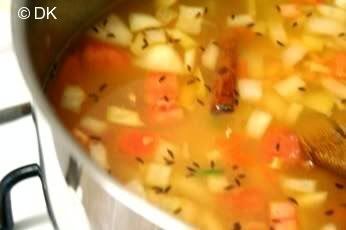
Close the lid and cook for 8-10 minutes until the lentils are almost soft.
Add the chopped chard, close the lid and cook until the greens have wilted.
I have said it before. Hyderabadi's know to eat well! Their food reeks of delicious aromatic smells and appetizing rich plates. After the Biryani and bread pudding, the next thing I love about their cuisine is Bhagara Baingan. The Indian eggplants (small variety), stuffed with aromatic spices and immersed in a rich gravy is my kind of having fun while eating!
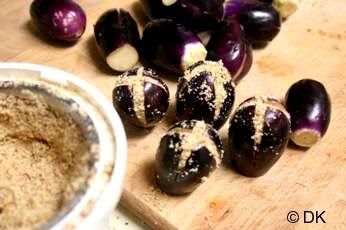
I love my mom's version which has pretty simple south Indian ingredients - but I also love Tarla Dalal's version which has more of North Indian spices. Since I couldn't decide between them, I made my own version which has a mix of these! Talk about hybridization! Choosing very small brinjals will help to reduce the amount of oil, used for cooking since they cook faster and need less oil. I choose the smallest ones, I can find among them. I know they look quite big in the picture, but they are not. :)
Method
Dry roast the ingredients for the Spice mix in low heat until aromatic.
Grind it into powder and stuff them inside the brinjals as shown in the picture. If the spice mix is left over, dont worry - it will be used for the gravy
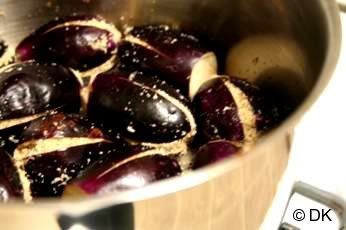
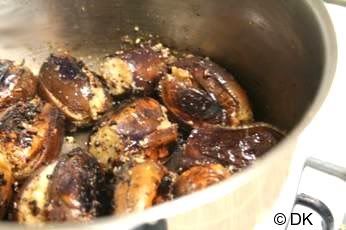
In a pan, add enough oil to coat the bottom of the pan and once hot, place the brinjals inside on their sides. Close the lid and let it cook for 5-10 minutes.
Gently turn them on the other side and let them cook for another 5-10 minutes. The smaller the brinjals, faster these get done. Turn them gently until they are soft and done. Set aside.
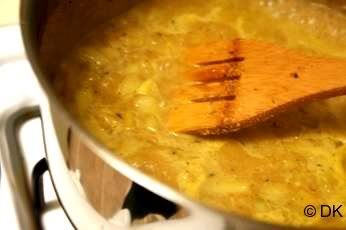
In the same pan, add mustard seeds and cumin. Once they splutter, add the onions, ginger garlic paste along with tamarind. Let it cook for 2-3 minutes.
Add about 2 cups water and let it come to a boil Add salt. Take care with the salt since you have already some in the stuffing. Let it come to a boil and then add the remaining spice mixture. Usually this will help to thicken up the gravy.
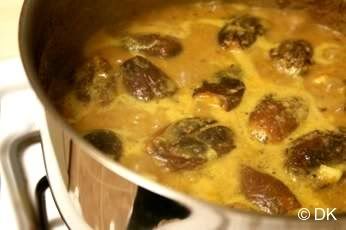
About 10 minutes before serving, drop the eggplants in the gravy. Be gentle, else the eggplants will break apart.
Garnish with cilnatro and serve along with some phulkas/roti
Its really hard for me to even think, that few years earlier, I used to hate soups. I was cajoled, threatened, blackmailed by my mom to start having soups to no effect. Then during my college days, a friend of mine managed to get me hooked to Tomato soup which was totally delicious in our cafeteria - but that was that! No other soups for me. Then after marriage, I started trying out various soups - well because I wanted to just - you know- try it out. Surprisingly I started liking the soups - No, don't think me conceited , but somehow my soups actually inculcated the habit and now here I am willing to try all kinds of soups.:)
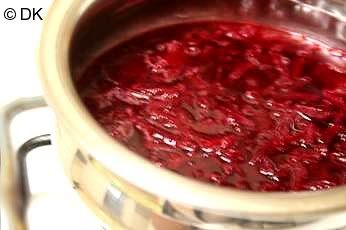
Borscht (borsht or borshch ) is traditionally an Eastern Europe soup where the prominence is given to Beetroot along with other vegetables. There are basically two variations of this soup – hot and cold and since we are not fans of cold soup, I opted for the former. It is totally yummy with minimal ingredients and effervescent flavors. The color is deep red thanks to the beetroot and its only enhanced further with the addition of Beetroot Kvas. This is a recipe from a ‘Detox health-plan cookbook’ which I adapted quite mildly for my tastes.
Method
To prepare Beetroot Kvas
Grate one beetroot, add it to 2/3 cup of water and lemon juice and bring to a boil. Cover and set aside for about 30 min.
For Borscht
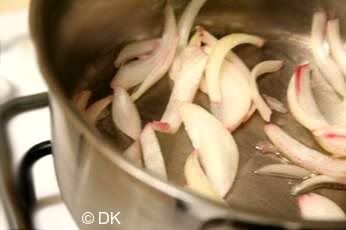
In a saucepan, in 1/2 tsp of olive oil, saute the onions until soft (yes, chop onions first - otherwise they will look 'bloody' like this one :)
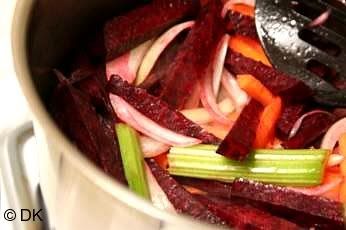
Chop beetroot, celery and carrot into thick strips and then along with garlic add them to the onions. Saute for 2 seconds with little salt (about a pinch or so).
Add the tomato puree and saute for another 1-2 min.
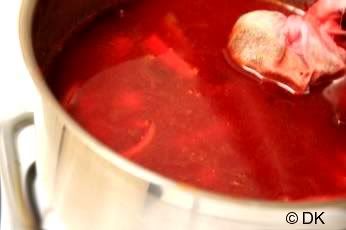
Tie the bay leaf, peppercorns, herbs and cloves in a muslin cloth. Add about 3 cups of water/stock to the saucepan, drop the muslin cloth with the stock, cover and cook for 20-30 minutes until the vegetables are soft.
Remove the muslin bag, add the strained Kvas, season to taste and serve garnished with chives.
This is also my entry for SWC : Soups hosted by Neha conceptualized by Cooking Station How to Remove Beetroot Stains
I love Beets and use it so often for my recipes. While I love the color, I personally am not so sure about seeing the color everywhere in my kitchen - wooden boards, counter tops, my clothes etc. Here are some tips which have helped me to counter this 'bloody' trail.
1. Its always better to clean right after cutting the beets. Don't let it dry out. Makes cleaning a bit harder.
2. Better safe than sorry - so don't wear your snow white, ultra light colors when cutting Beets - old worn out clothes are a good idea! :) Or else wear an Apron.
3.Having Lemons are such a boon. If your wooden chopping board has stained - sprinkle some salt over its "wounds" / stains - let it sit for 15-20 minutes, then with a chopped lemon rub it on the stains until the stain slowly dissoves. Sometimes if the stain is not dark enough, just lemon juice rubbed on the stained part for 20-30min is enough.
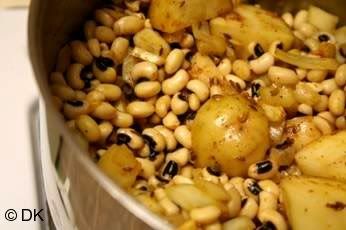
Another staple in my pantry after Chickpeas is Black Eyed Peas. Since I have been on a pantry cleaning run, I saw a small handful of these left over in the packet. I wanted to use them but at the same time, I had few guests coming over and it sure won't be enough for all of us. Hence thought of adding some potatoes to make the dish more mealy and of large quantity. These are also known as cowpeas and are rich in protein, magnesium, iron and folate. They are also immensely versatile.
They can be used in multiple ways from soups, to yummy and crunchy snacks to main course dishes. They also help to fill one up faster thus making me to resort to these for salads etc. I am on an everlasting diet remember!!!!! This curry is very simple to make and has hardly any prep work. All you need is to soak these, chop few potatoes, dump them along with spices together in one pot and forget them for next 20-30 min and Viola! yummy curry ready.
Method
1.Saute cumin seeds in 1/2 tsp oil. Add onions, ginger garlic, salt along with bay leaf and spices.
2.Add the potatoes, saute them for 2-3 minutes and then add drained black eyed peas
3.Add the tomato puree and cook for another 1-2 min
4.Add sufficient water to cover the mixture - about 1 to 1-1/2 cups, close the lid and let it cook for 15-20 min.
5.Once the black eyed peas have been cooked, add the ground paste - cook for another 5 min.


 Close the lid and cook for 8-10 minutes until the lentils are almost soft.